Cosy crochet Christmas cushion
Published on 7 November 2018 By Kate Eastwood/ Meg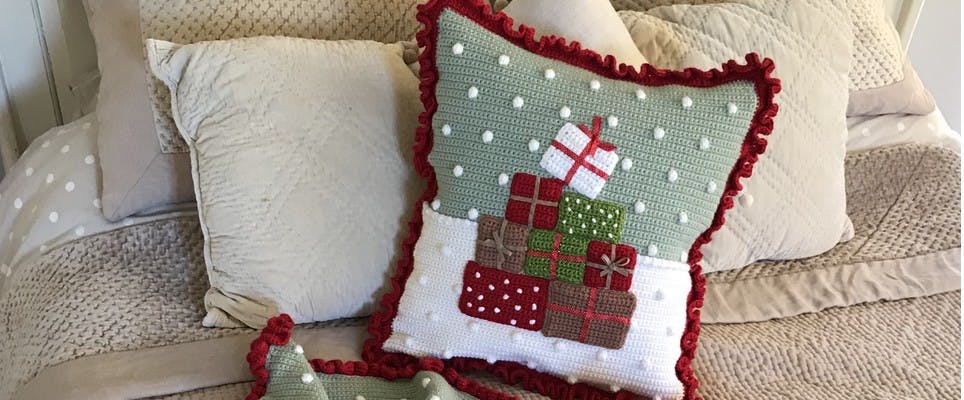
Christmas is a time for family, food, and fabulously outrageous decorations. There’s nothing better that putting on a bright and cheesy Christmas jumper, or adorning your house in a few too many lights. You can now bring the cheer to your living room with this crochet Christmas cushion pattern by Kate Eastwood from Just Pootling.
Featuring Christmas presents and plenty of snow bobbles to be worked throughout, this cushion is sure to spread the festive joy.
This Christmas cushion is made up of three main parts: a front panel, a lower back panel, and an upper back panel. These three pieces are all joined together around the edge and an overlap is formed at the back. This allows for the cover to be easily removable, which is great if you’ve got some wine-spilling guests coming over this year!
The front panel is worked in two colours, Paper White for the snow and Pistachio Green for the sky. The bobbles are worked in Snow Sparkle.
Materials
- Paintbox Yarns Wool Mix Aran
- 3 x 100g balls of Paintbox Yarn Wool Mix Aran in Pistachio Green
- 2 x 100g balls of Paintbox Yarn Wool Mix Aran in Pillar Red
- 2 x 100g balls of Paintbox Yarn Wool Mix Aran in Paper White
- 1 x 100g ball of Paintbox Yarn Wool Mix Aran in Soft Fudge
- 1 x 85g ball of Caron Simply Soft Party in Snow Sparkle
- 1 x 85g ball of Caron Simply Soft Party in Spring Sparkle
- 4.5mm hook
- 1 x 40cm x 40cm cushion pad/ inner
- Small amounts of co-ordinating ribbon (for presents)
Shop the supplies!
Front Panel
1
Master the bobble rows. Bring the Snow Sparkle up from the back of your work and work a yarn over. Work 4 tr all into the same stitch, leaving the last loop of each tr on the hook. Work a final yarn over in the main colour and pull through all the loops on your hook.
Pro Tip
When working a bobble row lay your Snow Sparkle along the top of the row so that it is worked in as you dc along the row and is there ready to be brought up from the back each time you need to make a bobble.
2
Make the snow section.
Row 1: Using the Paper White and the 4.5mm hook, make a chain of 72. Starting in the second chain from the hook, dc to the end of the chain. 71 sts. Chain 1 and turn at the end of this row (and every following row).
Rows 2 to 6: Dc. 71 sts.
Row 7: *This is Bobble Row 1. (RS) Lay the Snow Sparkle along the top of the row as described in step one and work 5 dc in the main colour. On the 6th stitch work a bobble of 4 tr, working the final yarn over in the main colour. Work 9 dc in the main colour and then work a second bobble. Continue working along the row, working a bobble with 9 dc in between each bobble. At the end of the row, work the final bobble and then 5 dc (7 bobbles in total).
Rows 8 to 16: Dc. 71 sts.
Row 17: This is Bobble Row 2. (RS) Lay the Snow Sparkle along the top of the row as described above and work 10 dc in the main colour. On the 11th stitch work a bobble of 4 tr, working the final yarn over in the main colour. Work 9 dc in the main colour and then work a second bobble. Continue working along the row, working a bobble with 9 dc in between each bobble. At the end of the row, work the final bobble and then 10 dc (6 bobbles in total).
Rows 18 to 26: Dc. 71 sts.**
Rows 27 to 46: Repeat from * (Row 7) to ** (Row 26) one more time. Finish off at the end of the final row.
Row 47: With the RS facing, re-join the Paper White at the right hand side and work a row as follows: Working into the front loops only, 1 dc + 1 htr in the next stitch, 1 dc in the following stitch. Repeat this stitch pattern to the end of the row and finish off.
3
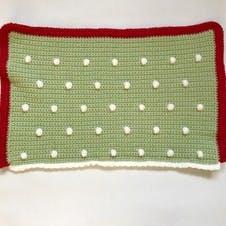
Make the sky section.
Row 1: With the RS facing you, join in the Pistachio Green at the right hand side. Working into the back loop only, dc to the end of the row. 71 sts.
Row 2: Dc. 71 sts.
Row 3: ***Work Bobble Row 1.
Rows 4 to 12: Dc. 71 sts.
Row 13: Work Bobble Row 2.
Rows 14 to 22: Dc. 71 sts. ****
Rows 23 to 41: Repeat from *** (Row 3) to **** (Row 22) one more time.
Row 42: Work Bobble Row 1.
Rows 43 to 50: Dc. 71 sts. Finish off.
4
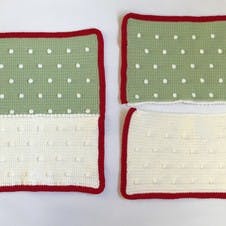
Finish the front panel.
Round 1: With RS facing, re-join the Pistachio at the start of the sky section and work dc up the side, working an increase into two of the corner stitches, along the top increase at corner as before and work down the left hand side. Finish off the Pistachio. Join in the Paper White and continue working dc down the left hand side, along the bottom and up the right hand side to the end of the snow, working the increases in the corner stitches. Finish off.
Round 2: Join in the Pillar Red and work a round of dc, increasing at each corner as before. Sl st to join at the end of the round. Ch 2.
Round 3: Work a round of tr, increasing at each corner as before. Sl st to join at the end of the round and finish off.
Lower back panel
1
Make the lower back panel.
Rows 1 to 46: Using Paper White and Snow Sparkle for the bobbles, work as for the snow section of the front panel.
Rows 47 to 50: Work rows of dc, without any bobbles.
Row 51: Dc, at the end of Row 51 continue on in dc down the left hand side. Along the bottom and up the right hand side, working 2 increases into each corner. Finish off.
2
Finish the lower back panel.
Round 1: With RS facing, join in the Pillar Red at the top left hand corner and dc down the left hand side, along the bottom and up the right hand side, increasing at each corner as before. Finish off.
Round 2: Re- join the red back at the start of the last round and work tr down the left hand side, along the bottom and up the right hand side, increasing at each corner as before. Finish off.
Upper back panel
1
Make the upper back panel.
Rows 1 to 42: Using Pistachio and Snow Sparkle for the bobbles, work as for the sky section of the front panel.
Rows 43 to 50: Dc. 71 sts.
Row 51: Dc, at the end of the row continue on in dc down the left hand side. Along the bottom and up the right hand side, working 2 increases into each corner. Finish off.
2
Finish the lower back panel.
Round 1: With RS facing, join in the Pillar Red at the bottom right hand corner hand corner and dc up the right hand side, along the top and down the left hand side, increasing at each corner as before. Finish off.
Row 3: Have your work right side facing you, and with the Pistachio edge at the top. At the top right hand corner join in the Snow Sparkle and working into the back loops only work a row of dc. Finish off.
Row 4: Re-join the same yarn back at the beginning of the last row, and working in both loops as normal, work to the end of the row as follows: 1 dc + 1 htr in the next stitch, 1 dc in the following stitch. Repeat to the end of the row and finish off.
How to make the presents step-by-step
1
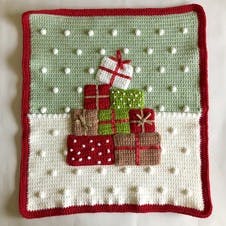
Make present 1.
Row 1: In Soft Fudge chain 18. Starting in the second chain from the hook dc to the end. 17 sts. Chain 1 and turn (at the end of this row and each following row).
Rows 2 to 15: Dc. 17 sts. At the end of the last row, continue on round the edge of the shape in dc. Sl st to join at the end of the round and finish off.
2
Make present 2.
Row 1: In Pillar Red chain 18. Starting in the second chain from the hook dc to the end. 17 sts. Chain 1 and turn (at the end of this row and each following row).
Rows 2 to 13: Dc. 17 sts. At the end of the last row, continue on round the edge of the shape in dc. Sl st to join at the end of the round and finish off.
3
Make present 3.
Row 1: In Pillar Red chain 10. Starting in the second chain from the hook dc to the end. 9 sts. Chain 1 and turn (at the end of this row and each following row).
Rows 2 to 11: Dc. 9 sts. At the end of the last row, continue on round the edge of the shape in dc. Sl st to join at the end of the round and finish off.
4
Make present 4.
Row 1: In Spring Sparkle chain 13. Starting in the second chain from the hook dc to the end. 12 sts. Chain 1 and turn ( at the end of this row and each following row).
Rows 2 to 11: Dc. 12 sts. At the end of the last row, continue on round the edge of the shape in dc. Sl st to join at the end of the round and finish off.
5
Make present 5.
Row 1: In Soft Fudge chain 11. Starting in the second chain from the hook dc to the end. 10 sts. Chain 1 and turn (at the end of this row and each following row).
Rows 2 to 11: Dc. 10 sts. At the end of the last row, continue on round the edge of the shape in dc. Sl st to join at the end of the round and finish off.
6
Make present 6.
Row 1: In Spring Sparkle chain 14. Starting in the second chain from the hook, dc to the end. 13 sts. Chain 1 and turn (at the end of this row and each following row).
Rows 2 to 9: Dc. 13 sts. At the end of the last row, continue on round the edge of the shape in dc. Sl st to join at the end of the round and finish off.
7
Make present 7.
Row 1: In Pillar Red chain 10. Starting in the second chain from the hook dc, to the end. 9 sts. Chain 1 and turn (at the end of this row and each following row).
Rows 2 to 11: Dc. 9 sts. At the end of the last row, continue on round the edge of the shape in dc. Sl st to join at the end of the round and finish off.
8
Make present 8.
Row 1: In Snow Sparkle chain 13. Starting in the second chain from the hook dc to the end. 12 sts. Chain 1 and turn ( at the end of this row and each following row).
Rows 2 to 11: Dc. 12 sts. At the end of the last row, continue on round the edge of the shape in dc. Sl st to join at the end of the round and finish off.
9
Finish the presents. For the red present on the bottom row and the green present on the third row, sew some French Knots in Snow Sparkle. On all the other presents add a combination of co-ordinating ribbons and bows, stitching in place with a needle and thread. Lay the presents out on to the front panel and pin into position. Sew into place with a needle and thread.
Finish the cushion
1
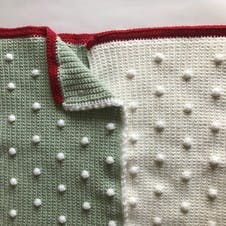
Finishing up. Place the front panel, right side down, on to a flat surface. With WS together (RS facing out), place the lower back panel in to position. With WS together (RS facing out), place the upper back panel into position. You will find that the upper back panel overlaps the lower back panel. Pin the pieces together all the way around the edge.
2
Finishing the border.
Round 1: Turn the cushion over so that the front panel is facing you and join in the Pillar red yarn somewhere round the edge. Dc all the way around the edge of the cushion, increasing twice at each corner, and join all of the pieces together. Sl st to join at the end of the round and Ch 1.
Round 2: Work 2dc in to each stitch all the way around. Sl st to join at the end of the round. Ch 1.
Round 3: Work 2dc in to each stitch all the way around. Sl st to join at the end of the round and finish off and sew in any ends.
3
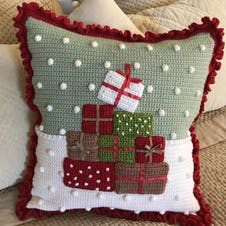
Complete the cushion. Insert the cushion pad in to the cover. You should find that the overlap is deep enough for the opening to stay closed but if not just attach a couple of poppers to hold it in place.


