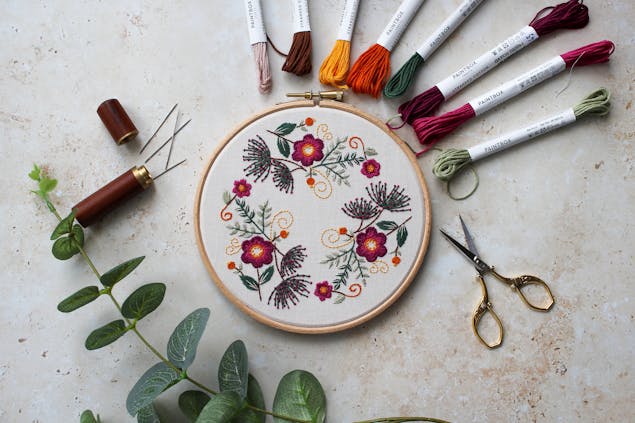
Embroider these Summer and Autumn Bloom designs with a Paintbox Crafts Embroidery Kit and this exclusive FREE tutorial!
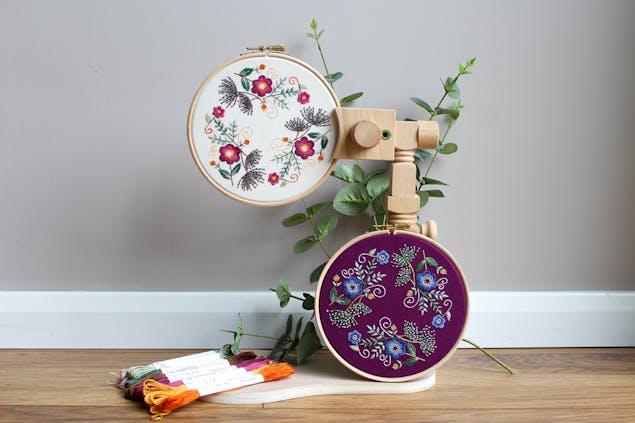
Published on 8 April 2022 2 min readLooking for a mindful craft to indulge in as the evenings get longer and the sun gets warmer? This Summer and Autumn Bloom embroidery duo is the perfect project to do while soaking up the sun or lounging in the garden. Get stitching with these fantastic Paintbox Crafts Summer and Autumn Bloom embroidery kits designed by Hope & Heart.
Once you have your new kit, grab your iced matcha latte and find a sunny spot by some flowers to inspire you! All you need to get started is neatly packaged in these great kits. Both Summer and Autumn Paintbox Craft Bloom Embroidery Kits include:
• Threads
• Aida fabric
• Embroidery hoop
• Needles
• A pair of scissors
• An instructional leaflet pattern
Follow the instructions in your kit or these easy steps to take you from first stitch to finished bloom. So what are you waiting for? Let's get started!
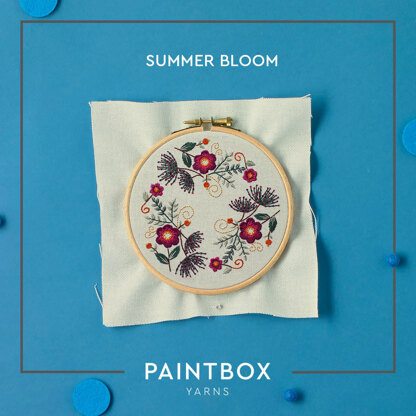
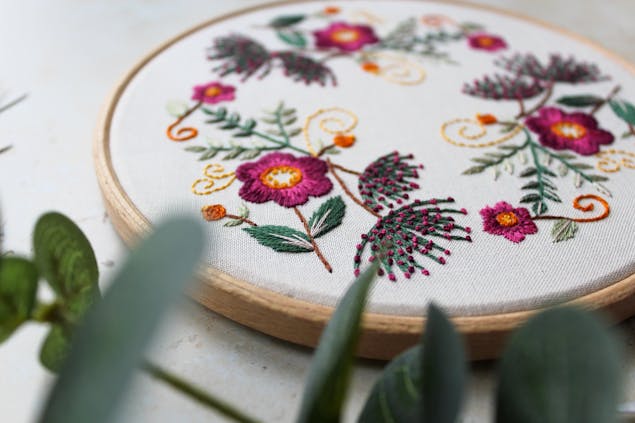
Summer Bloom embroidery pattern
Set on a backdrop of Oyster white quilting cotton, this rich floral motif includes all the bright berry and plum shades of summer we love. Freckled with sunburnt orange buds and rich green summer foliage, you'll love exploring how different embroidery stitches can give character, tone and texture to every branch, flower and leaf.
Materials
- 15cm/6” embroidery hoop:
- Elbesee 6 inch (15.24 cm) Wooden Embroidery Hoop
- Embroidery needle (Hope & Heart used size 5):
- DMC 10 Darners (Sizes 1-5)
- Scissors:
- Klasse Stork Embroidery Scissors
- Kona cotton 20x20cm - Oyster:
- Robert Kaufman Kona Cotton Solids Fat Quarter Bundle - FQ-909-12
- Heat erasable pen:
- Clover Blue Chacopen With Eraser
- 17x17cm felt (optional):
- Trimits Acrylic Felt: 10 Pieces - 23cm x 30cm - White
- Paintbox Crafts Stranded Cotton
- Paintbox Crafts Stranded Cotton in the following shades: #174 embroidery thread, #30 embroidery thread, #178 embroidery thread, #170 embroidery thread, #145 embroidery thread, #27 embroidery thread, #05 embroidery thread, #56 embroidery thread
- Plain cotton thread
1
If you're going to back your hoop with felt. Trace around the outside of the internal hoop and put to one side. This will be your template for your backing.
Prepare your 15cm/ 6” embroidery hoop and transfer your template onto the fabric.
Pro Tip
If you would like the template completely removed at the end of your project using a heat erasable pen will ensure you can remove the template without having to remove it from your hoop.
2
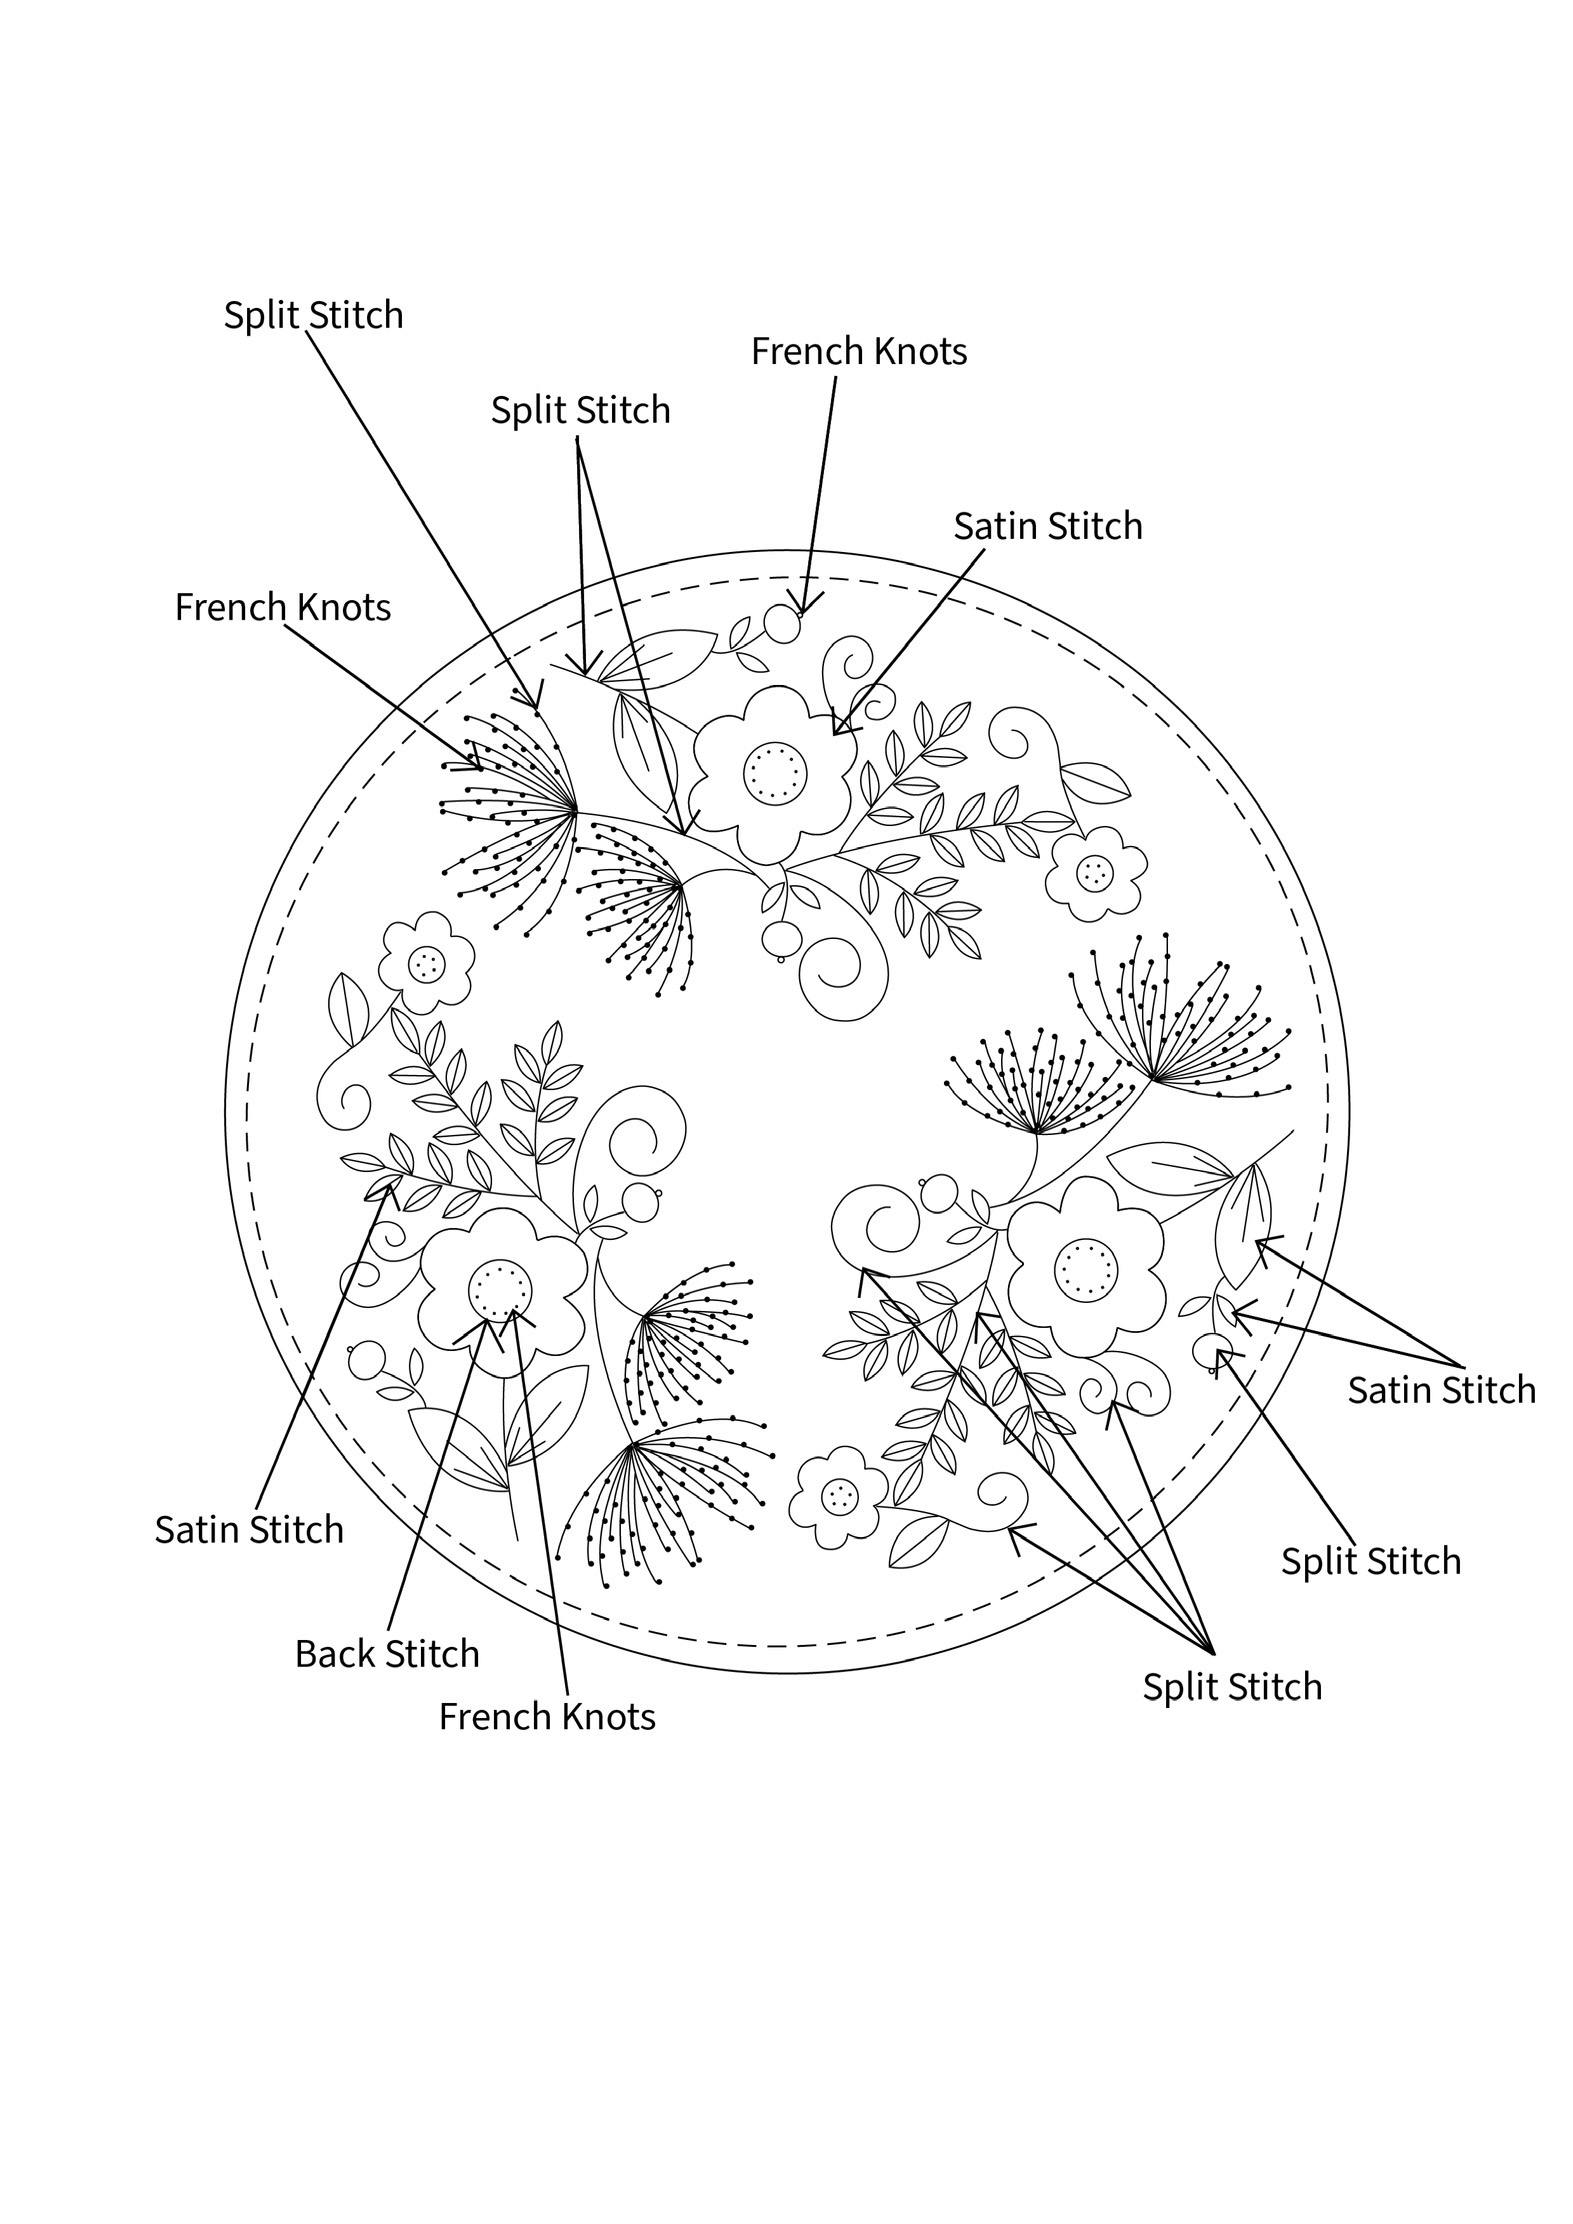
This uses 2 strands of embroidery thread throughout. Starting with the biggest flower, outline your shape with the back stitch method using your purple #145 thread.
3
Fill in the flower shape using the long and short stitch method. Start from the edge using purple #145 thread and work your way inwards finishing with your magenta #170 thread.
4
Once your flower has been filled, pick up your orange #178 thread, using the split stitch method to sew the inner circle line.
5
Now you can add your french knots to the centre using your yellow #30 thread. Wrapping once around the needle, fill in as many as you can spacing them evenly.
6
Complete the smaller flower using the same steps 3 - 6 only using the flower shades in reverse. Your magenta #170 thread is now on the outside, blending into your purple #145 thread.
7
Next, taking your brown #56 thread, use the split stitch method for the stems.
8
Moving onto the larger flower’s leaves, use the satin stitch method with dark green #27 thread to fill in the shape, then add details using cream #174 thread.
9
For the smaller flower's leaves, work the satin stitch method using your light green #05 thread. Then add a single line of thread down the centre of the leaf using your cream #174 thread.
10
Next, use your dark green #27 thread, and with the split stitch method, sew the stems of the branches.
11
Once the branch stems are complete, take your dark green #27 and light green #05 thread, working the satin stitch method to fill in the leaves. Then use your cream #174 thread to stitch a line down the centre of each leaf.
12
Stitch the open flower stems using your dark green #27 thread, working the split stitch method. Once your base is complete, add french knots using a single wrap around the needle in alternating colours of purple #145 and magenta #170 thread until the flower looks full.
13
Moving onto the small flower buds. Work the split stitch method with your orange #178 thread, starting from the edge of the circle and working your way to the centre. Add a french knot at the end of the bud in yellow #30 thread.
14
Stitch the stem of the small flower bud using the split stitch method with brown #56 thread and fill in the leaves working the satin stitch method in light green #05.
15
Next, working the back stitch method, use your yellow #30 thread, to complete the curls, and the split stitch method for the curl using your orange #178 thread.
16
Repeat steps 3 - 16 until all of your template has been stitched.
17
Use a warm hairdryer to carefully remove your template.
18
Trim off any excess fabric around your hoop leaving around 2cm.
19
Using your cotton thread work the running stitch method to gather all the fabric at the back of the embroidery hoop and tie off.
20
Cut out your felt backing.
21
Finally, secure your felt using the blanket stitch method.
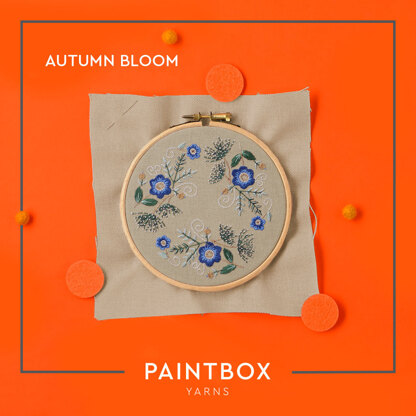
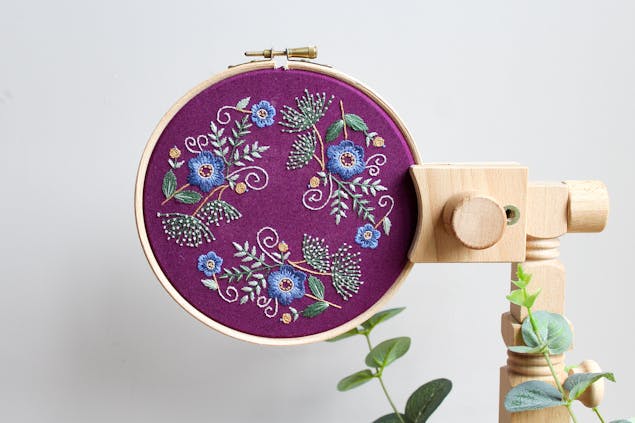
Autumn Bloom embroidery pattern
Pretty blue flowers and evergreen foliage embroidered on a warm, woolly brown backdrop. We love the autumn inspired edition of the bloom pattern. A sweet embroidery craft that will brighten up any corner of your home. The perfect memento of autumn blooms to enjoy with winter around the corner.

Materials
- 15cm/6” embroidery hoop:
- Elbesee 6 inch (15.24 cm) Wooden Embroidery Hoop
- Embroidery needle (Size 5):
- DMC 10 Darners (Sizes 1-5)
- Scissors:
- Klasse Stork Embroidery Scissors
- Kona cotton 20x20cm - Berry:
- Robert Kaufman Kona Cotton
- Clover - White gel pen:
- Clover White Marking Pen Fine
- 17x17cm felt (optional):
- Trimits Acrylic Felt: 10 Pieces - 23cm x 30cm - White
- Iron
- Paintbox Crafts Stranded Cotton
- Paintbox Crafts stranded cotton in the following shades: #174 embroidery thread, #118 embroidery thread, #52 embroidery thread, #72 embroidery thread, #185 embroidery thread, #42 embroidery thread
- Plain cotton thread
1
If you're going to back your hoop with felt. Trace around the outside of the internal hoop and put to one side. This will be your template for your backing.
Pro Tip
Prepare your 15cm/ 6” embroidery hoop and transfer your template onto the fabric using the Clover white gel pen.
2
This uses 2 strands of embroidery thread throughout. Starting with the biggest flower, outline your shape with the back stitch method using your dark blue #118 thread.
3
Fill in the flower shape using the long and short stitch method. Start from the edge using your dark blue #118 and work your way inwards finishing with light blue #52 thread.
4
Once your flower has been filled, use your cream #174 thread, using the split stitch method to sew the inner circle line.
5
Now you can add your french knots to the centre using your mustard #72 thread. Wrapping once around the needle, fill in as many as you can spacing them eventually.
6
Complete the smaller flower using the same steps 3 - 6 only using the flower shades in reverse. Your light blue #52 thread is now on the outside, blending into the dark blue #118.
7
Next, using your mustard #72 thread, use the split stitch method for the stems.
8
Moving onto the larger flower’s leaves, use the satin stitch method with your dark green #42 thread to fill in the shape, then add details using your light green #185 thread.
9
For the smaller flowers, use the satin stitch method in light green #185 thread. Then add a single line of thread down the centre of the leaf using your cream #174 thread.
10
Next, use your dark green #42 thread, with the split stitch method to sew the stems of the branches.
11
Once the branch stem’s are complete use your dark green #42 and light green #185 thread, working the satin stitch method to fill in the leaves. Then using your #174 thread stitch a line down the centre of each leaf.
12
Stitch the open flower stems using your dark green #42 thread, working the split stitch method. Once your base is complete, add french knots using a single wrap around the needle with your cream #174 thread until the flower looks full.
13
Moving onto the small flower buds, work the split stitch method in mustard #72, starting from the edge of the circle and working your way to the centre. Add a french knot at the end of the bud in light blue #52.
14
Stitch the stem of the small flower bud using the split stitch method in dark green #42 thread and fill in the leaves working the satin stitch method in light green #185.
15
Next, working the split stitch method, use your cream #30 thread to complete the curls.
16
Repeat steps 3 - 16 until all your template has been stitched.
17
To remove your template, take your fabric out of your hoop and run a steam iron over it. Repeat until all the white lines have been removed.
18
Place your fabric back in your embroidery hoop and trim off any excess fabric, leaving around 2cm.
19
Using your cotton thread, work the running stitch method to gather all the fabric at the back of the embroidery hoop and tie off.
20
Cut out your felt backing.
21
Finally, secure your felt I’m place using the blanket stitch method. And that's it! Enjoy your pretty Autumn Bloom embroidery design.