How to sew a zip
Published on 30 May 2019 By EmmaZips. Just the word alone can send a shiver down your spine. Don’t be afraid, armed with the knowledge and this simple step by step guide to how to sew a zip we can get through this together. Ok, so that’s a little dramatic, but zips are intimidating.
But why have zips got such a bad reputation? The thing about a zip is it can make your lovingly cut and sewn garment all lumpy and bumpy if you don’t get it right. If you haven’t lined things up properly, in spite of all your careful measuring, one side will be higher than the other and ripping them back out can be a soul destroying experience.
So here’s our easy, step by step guide to sewing in a zip, with a cheeky twist using sticky tape instead of pins.
If you’re more comfortable using pins, the method is the same, you just need to pin each side of the zip to the fabric at the start.
1
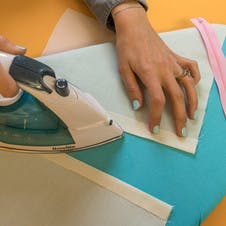
Press those edges. Iron a 1.5cm - ⅝ inch hem along the edge of the two pieces of fabric that you’ll be joining with the zip. This works the same for a pair of trousers as it does for a purse, if this is your first attempt it’s always worth having a practice on some scraps of fabric to see how it goes.
2

Pin zip in place. Place the ironed pieces next to each other, right side down, hem to hem. Carefully position the zip, face down, so that the zip lines up with centre of the hemlines. Now secure the zip in place, ready for sewing. Here’s the sneaky bit, you could use pins to secure the zip in place, but there’s a real trend for using tape. It’s quick, easy and doesn’t distort the fabric.
Pro Tip
Masking tape or washi tape are ideal as they’re low tack and easy to peel off after.
3
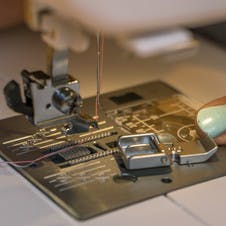
Attach zipper foot. Replace your normal foot with the zipper foot. There’s usually a little leaver at the back of the post that holds the needle, all you need to do is make sure the foot is in the raised position, lift the little leaver and the foot should drop off. If you’re unsure, check the manual that came with your machine or just give it a Google. Place the new one under the post, lower the foot back down and it should all click into place.
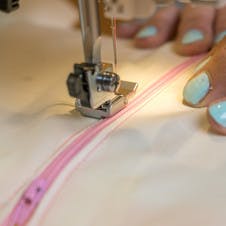
4

Sew the zip in place. Open the zip a little way. With the right side of the fabric facing you, place the zipper foot as close to the edge of the zip as you can get it. Sew a straight line until you get to the zipper head, lift the foot, do the zip up, lower the foot and sew to the end of the zip.
5
When you’ve reached the end, lift the foot, turn your fabric, drop the foot back down and sew across the bottom of the zip. Now repeat and sew up the other side, keeping as close to the zip as you can. Open the zip a little way before you get to the end as you did in the previous step.