Crochet a Christmas tree cushion!
Published on 11 December 2019 By Holly Butteriss 1 min read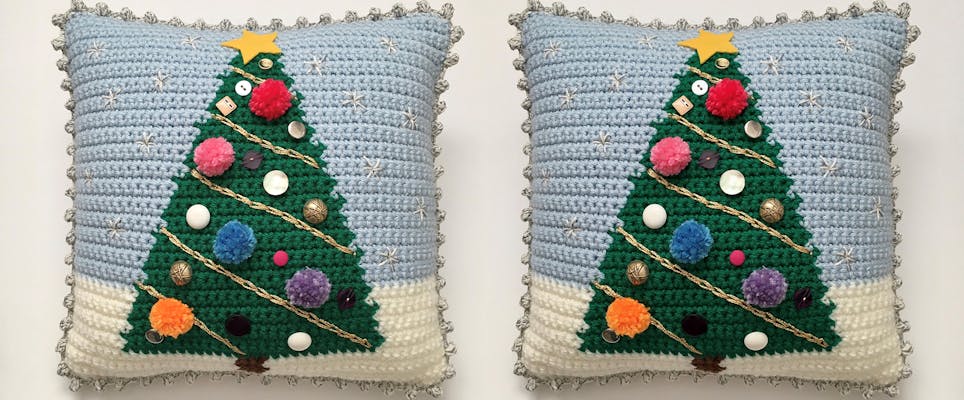
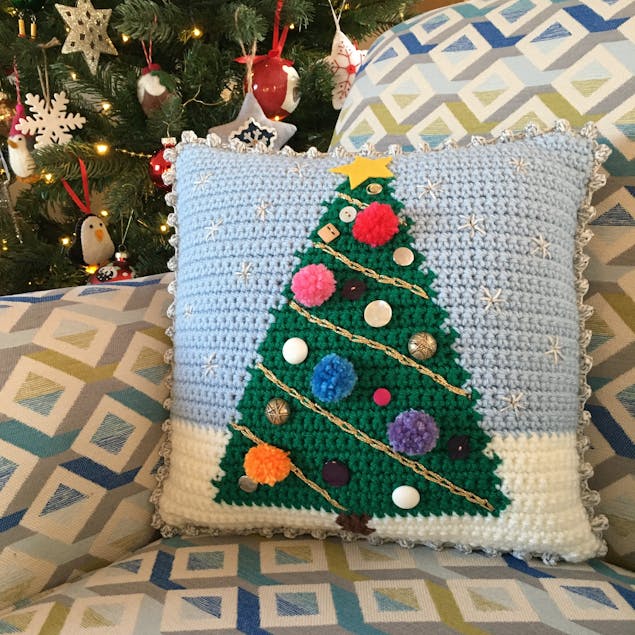
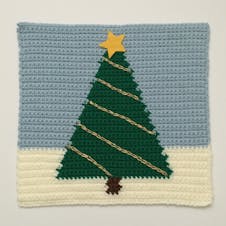
Oh tis the season to be jolly! This wonderfully wintery Christmas tree cushion is the perfect crochet project to make your home feel more festive! The lovely Chloe Bailey will take you through her step-by-step guide so you can make your very own cushion. This is one project yule definitely love!
Get delving into your stash and hook up this fabulously festive Christmas tree cushion! Using intarsia crochet you’ll make the front panel of your cushion before decorating it with glittery thread tinsel, buttons, mini pom poms, a star topper, and finally adding snowflakes and a silver pom pom edging to complete the wintery scene!
Here’s a downloadable pdf of the intarsia chart.
Abbreviations used (UK terms):
ch - chain
dc – double crochet
tr – treble crochet
You can use our handy conversion table for US terms!
Materials
- Paintbox Yarns Simply Chunky in Champagne White, Coffee Bean, Grass Green, and Duck Egg Blue
- Paintbox Yarns Simply Chunky
- Paintbox Yarns Metallic DK in Martini
- Paintbox Yarns Metallic DK
- Crochet hooks 4mm (G/6) and 5mm (H/8)
- KnitPro Aluminium Soft-Grip Silver Crochet Hook
- 14” square cushion pad
- Metallic thread
- Yarn scraps for mini pom poms
- A small piece of yellow felt
- Buttons
- Rico Navy Button Mix
- Sewing needles
- Scissors (or an optional glue gun)
- Gold Anchor Artiste Metallic
- Anchor Artiste Metallic
How to make the front of your cushion
1
With white yarn and 5mm hook ch46, skip the first ch and dc45 back along the starting chain. When you reach the end ch1 and turn. (NB. remember to work a turning chain at the end of each row).
2
Skip the turning chain and work another dc row in white.
3
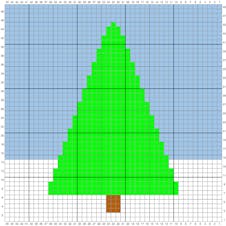
You’ll start to add the tree trunk in row 3, and then continue to follow the intarsia chart to work the full tree pattern, ending with 4 rows of dc in blue at the top of the picture.
Pro Tip
For a full intarsia crochet how-to, check out this tutorial which includes how to prepare your yarn, reading an intarsia chart, and changing colours.
Decorating your cushion!
1
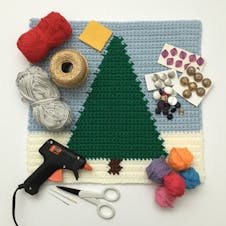
Gather together all the bits and pieces that you want to use to decorate your Christmas tree!
I have picked out some vintage buttons from my stash; some yarn scraps to make mini pom poms; a piece of yellow felt to make a star; gold Anchor Artiste Metallic for tinsel and various tools.
2
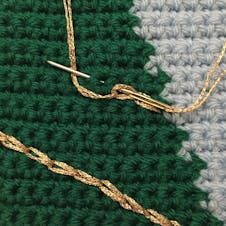
Add tinsel to the tree. Using a double strand of gold metallic thread, sew diagonal rows of tinsel using a chain stitch.
3
Add a star topper. Cut a 5 pointed star out of the piece of yellow felt and attach it to the top of the tree. I have used a glue gun for this, but you could sew it on if you prefer.
How to make your pom poms
1
Make a selection of mini pom poms out of your assorted yarns.
2
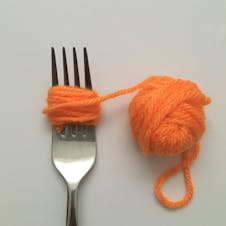
If you have a tiny pom pom maker then you’re all set, but if you want a quick and easy way to make some teeny tiny pom poms here’s how I do it in just a few easy steps!
Wrap the yarn about 20 times around a fork.
3
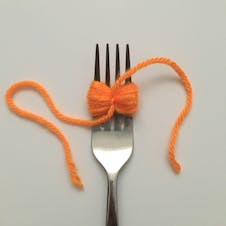
Take a length of yarn, approx 12” long, thread it through the teeth of the fork and tie around the wound yarn.
4
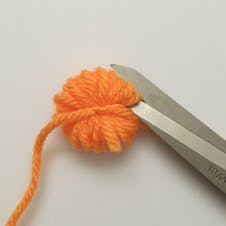
Slip the yarn off the fork and cut all the loops.
5

Fluff the pom pom into shape before trimming it evenly all over.
Pro Tip
Don’t cut the long yarn ends that you knotted around the pom pom so that you can then use those ends to sew it onto the cushion!
Finishing your cushion!
1

I have made a second copy of the front, so that the cushion is double sided. If you prefer a plain back to your cushion, make it as follows:
With your chosen chunky yarn and 5mm crochet hook, ch46, skip the first chain and dc45 back along the starting chain, when you reach the end ch1 and turn. (NB. remember to work a turning chain at the end of each row).
Work 48 more rows of dc, then fasten off and sew in ends.
2
Join the front and back cushion panels together using Paintbox Yarns Metallic DK in Martini and a 4mm crochet hook.
With front and back panels held together join the yarn in any stitch along the top or bottom edge (it is easier to make sure you’re matching up the two pieces if you start on the top or bottom edge!)
Work 1dc into each stitch, making sure to crochet through both the front and back panels to join them together, until you reach the corner.
3dc into the corner space, then continue working 1dc into each space down the side.
3
Continue to work around the cushion, joining the two panels, remembering to work 3dc into each corner.
When you reach the final side, insert your cushion pad before completing to close with a slip stitch to start. Don’t fasten off the yarn here, you can continue straight into the pom pom border!
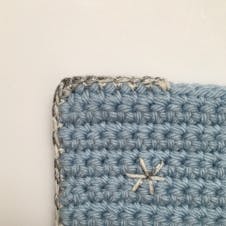
Add a pom pom border!
1
To add a silver pom pom border *slip stitch into the next 2 sts, then work a pom pom stitch into the next st*, repeat * to * around the cushion and when you reach the start of the pom pom border fasten off and sew in the ends!
2
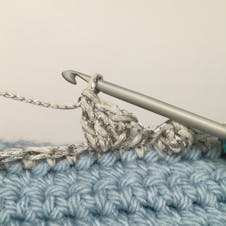
To make a pom pom stitch, 4tr into the stitch.
3
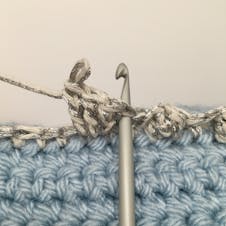
Remove your hook from the current loop, insert hook into the top of the first tr.
4
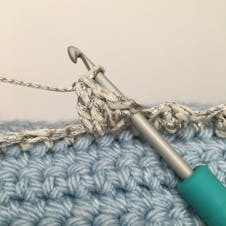
Insert hook back through the current loop.
5
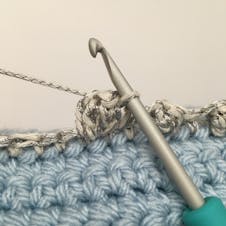
Pull loop through the first tr.
And you're done! One wonderfully Christmassy crochet cushion.