How to frame your cross stitch
Published on 24 July 2019 1 min read
Once you've completed your embroidery there's nothing like displaying your lovingly made craft for the world to see!
Framing your embroidery is the perfect (not to mention professional!) final touch before hanging in your home or gifting to a loved one. The easiest way to mount work for framing is to use a foam board (a board simply constructed of foam), sandwiched between two layers of acid-free card.
If you have used dark thread or fabric for your background, it's best to use a dark foam board. But if you can’t find any just add a sheet of dark acid-free card between the stitching and board for the same result.
How to frame your cross stitch
1
Prepare your foam board to fit your frame. Cut a piece of foam board to fit inside your chosen frame, cutting it slightly smaller than your blocked stitching to allow room for the fabric and pins.
2
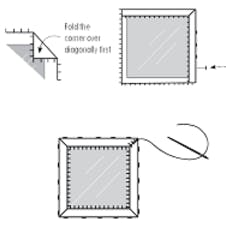
Position your design centrally over the foam board. Fold the corner over. Using stainless steel flat-headed pins, secure the stitching to the foam board by pushing a pin into the foam part of the board at the centre of each side. Repeat along each edge, gradually working out from the centre pin and gently pulling the fabric tight as you go. Keep checking that your work is still central.
3
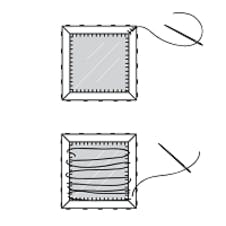
Secure and sew. Once all the edges have pins along them, mitre the corners neatly and secure using a few stitches. At this stage you could also lace across the back, as shown, to make the work more secure.
4
Finishing. Place the work in the frame and cover with the backboard. Tape up the back using brown gum tape. You're done!