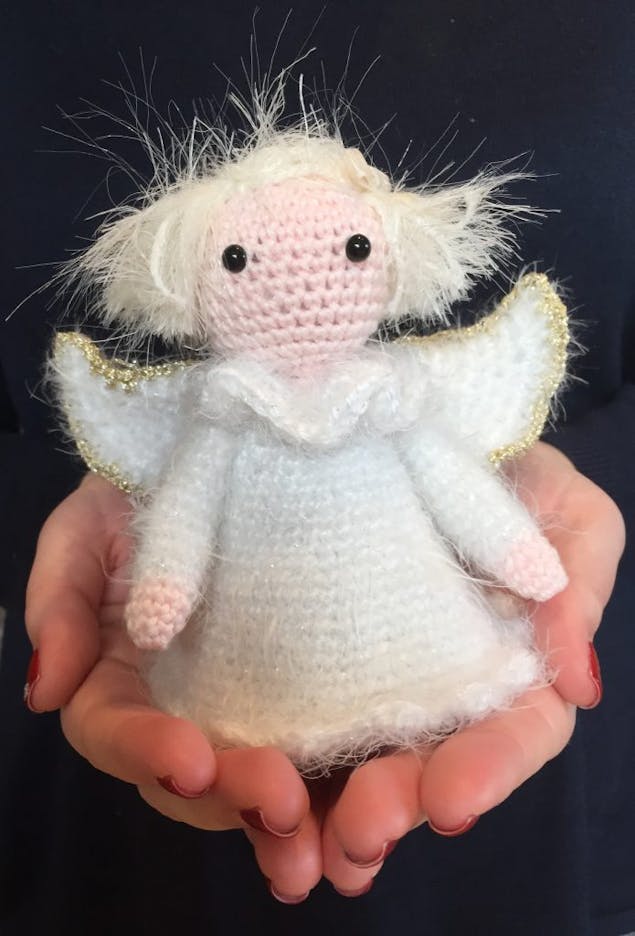
Crochet the cutest angel for your Christmas tree
Published on 4 December 2019 1 min read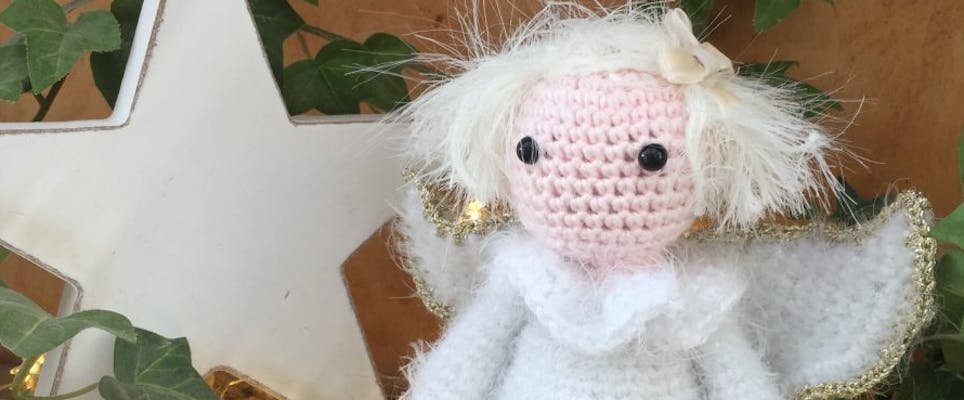
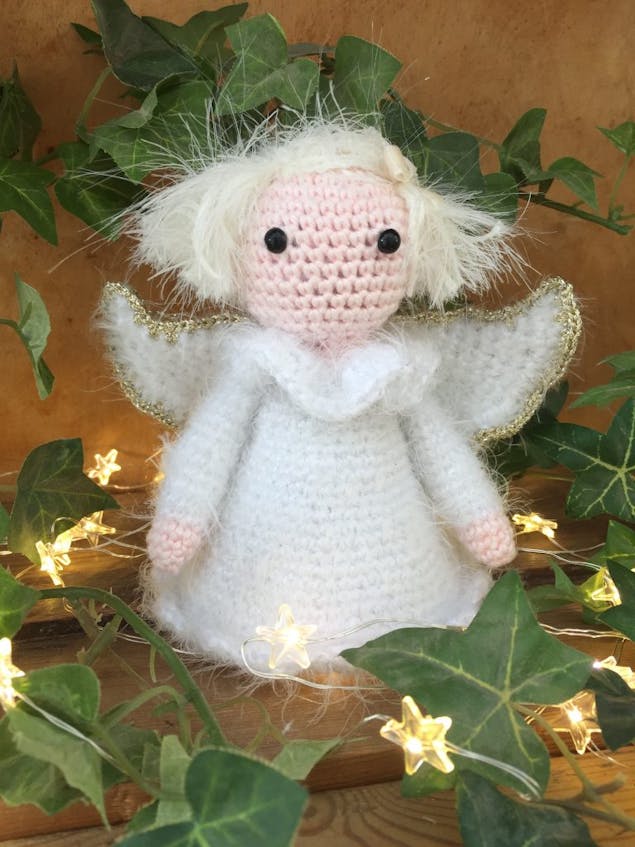
Can you hear those sleigh bells ringing? The festive season is upon us, and if you’re searching for the perfect Christmas tree topper, we have just the thing!
Kate Eastwood has designed this adorable little crochet angel that will look simply gorgeous taking pride of place on your tree.
To make this fab little topper, Kate has used a variety of different textured yarns. The finished angel is 13cm tall.
The angel is worked from the top of the head down, in continuous rounds. You may find it helps to work with a stitch marker.
Materials
- 2.5mm crochet hook
- 4.5mm crochet hook
- Paintbox Yarns Cotton DK
- 1x ball in 453 for the head, hands and base
- Sirdar Ophelia
- 1x ball in 0107 for the dress, arms and wings
- Bergere de France Angora
- 1x ball in Ecru for the hair
- Twilleys Goldfingering
- A small amount to edge the wings
- 2 x small black safety eyes
- Toy stuffing
How to make the head and body
1
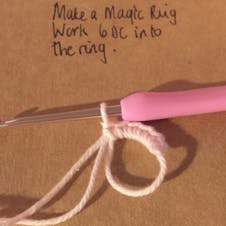
Round 1: Begin by making a magic circle and work 6 DC into the ring.
2
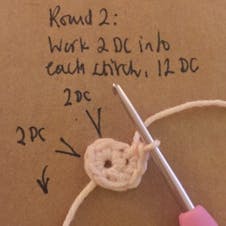
Round 2: Work 2 DC into each stitch from the first round, 12 sts.
3
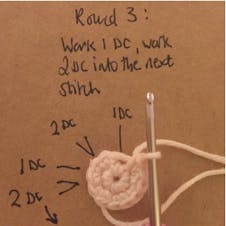
Round 3: *Work 1 DC into the first stitch and then 2 DC into the next stitch.* Repeat from * to * all the way round,18sts.
4
Round 4: *Work 1 DC into each of the next 2 stitches and then 2 DC into the next stitch.*
Repeat from * to * all the way round, 24 sts.
5
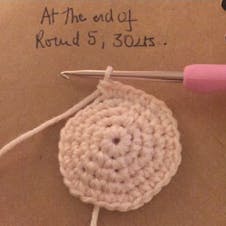
Round 5: *Work 1 DC in to each of the next 3 stitches and then 2 DC into the next stitch.*
Repeat from * to * all the way round, 30 sts.
6
Rounds 6 to 13: Work a round of DC, 30 sts.
7
Round 14: *DC into each of the next 3 stitches then decrease 2 by DC the next 2 stitches together.* Repeat from * to * all the way around, 24 sts.
8
Round 15: Decrease by DC 2 stitches together all the way around, 12 sts.
9
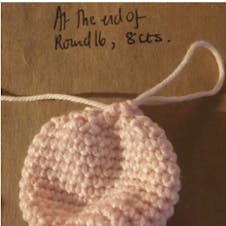
Round 16: * DC into the next stitch and then decrease by DC the next 2 stitches together.* Repeat from * to * all the way around, 8 sts.
10
Round 17: For this round you are now going to increase to start the shaping of the neck and body. DC 2 into each stitch all the way around, 16 sts.
11
Round 18: Work a round of DC, 16 sts.
12
Round 19: *Work 1 DC into the first stitch and then 2 DC into the next stitch.* Repeat from * to * all the way round, 24sts.
13
Rounds 20 and 21: Change to the white yarn and work a round of DC, 24 sts.
14
Round 22: *Work 1 DC into each of the next 2 stitches and then 2 DC into the next stitch.* Repeat from * to * all the way round, 32 sts.
15
Rounds 23 and 24: Work a Round of DC, 32 sts.
16
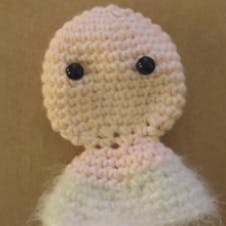
After completing Round 24, fix the safety eyes in place and stuff the head.
17
Round 25: Work a Round of DC, 32 sts.
18
Round 26: *Work 1 DC into each of the next 3 stitches and then 2 DC into the next stitch.* Repeat from * to * all the way round, 40 sts.
19
Rounds 27 to 29: Work a Round of DC, 40 sts.
20
Round 30: *Work 1 DC into each of the next 4 stitches and then 2 DC into the next stitch.* Repeat from * to * all the way round, 48 sts.
21
Rounds 31 to 33: Work a Round of DC, 48 sts.
22
Round 34: *Work 1 DC into each of the next 5 stitches and then 2 DC into the next stitch.* Repeat from * to * all the way round, 56 sts.
23
Rounds 35 to 37: Work a Round of DC, 56 sts.
24
Round 38: *Work 1 DC into each of the next 6 stitches and then 2 DC into the next stitch.* Repeat from * to * all the way round, 64 sts.
25
Round 39: Work a Round of DC, 64 sts. Finish off and sew in the ends.
26
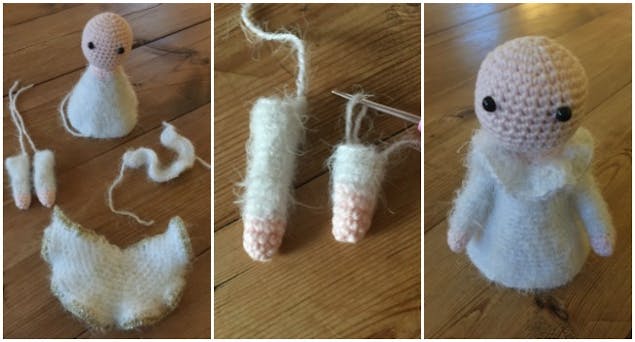
The next stage is to make the additional parts for the angel. She will need two arms, a ruffle to go around the top neck edge of the dress and some wings.
How to make the arms
1
Round 1: Using the pink yarn make a Magic Ring and work 6 DC into the ring.
2
Round 2: *Work 1 DC into the first stitch and then 2 DC into the next stitch.* Repeat from * to * all the way round, 9 sts.
3
Rounds 3 and 4: Work a round of DC, 9 sts. At the end of Round 4 change to the white yarn.
4
Now continue working rounds of 9 DC until the arm measures approximately 5.5 cm . Finish off leaving a long tail. Make a second arm.
How to make the neck ruffle
1
Chain 25.
2
Row 1: Starting in the 2nd chain from the hook work 2 HTR into each stitch all the way along the chain. At the end of the row Chain 1 and turn.
3
Row 2: Work 1 HTR into each stitch, all the way along the row. Finish off, leaving a long tail.
4
Using the long yarn tails on both of the arms and the neck ruffle sew the additional pieces on to the angel.
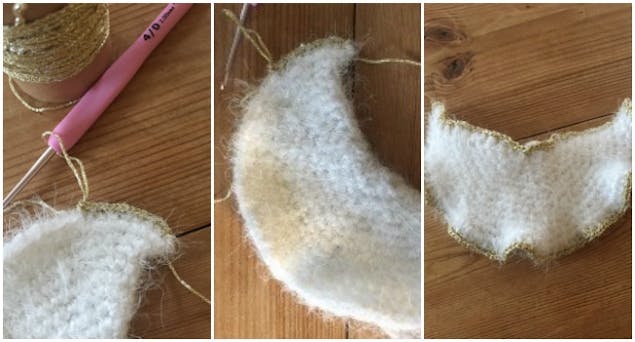
How to make the wings
Pro Tip
The wings are made from a circle of crochet that’s folded in half and joined together around the edge.
1
Round 1: Make a Magic Ring and work 8 DC in to the ring.
2
Round 2: Work 2 DC into each stitch from the first round, 16 sts.
3
Round 3: *Work 1 DC into the next stitch and then 2 DC in to the next stitch.* Repeat from * to * all the way round, 24 sts.
4
Round 4: *Work 1 DC into each of the next 2 stitches and then 2 DC into the next stitch.* Repeat from * to * all the way round, 32 sts.
5
Round 5: *Work 1 DC into each of the next 3 stitches and then 2 DC into the next stitch.* Repeat from * to * all the way round, 40 sts.
6
Round 6: *Work 1 DC into each of the next 4 stitches and then 2 DC into the next stitch.* Repeat from * to * all the way round, 48 sts.
7
Round 7: *Work 1 DC into each of the next 5 stitches and then 2 DC into the next stitch.* Repeat from * to * all the way round, 56 sts.
8
Round 8: *Work 1 DC into each of the next 6 stitches and then 2 DC into the next stitch.* Repeat from * to * all the way round, 64 sts. Finish off and sew in the ends.
9
Round 9: Work a round of DC, 64 sts.
10
Round 10: *Work 1 DC into each of the next 7 stitches and then 2 DC into the next stitch.* Repeat from * to * all the way round, 72 sts. Finish off and sew in the ends.
11
Round 11: Work a round of DC, 72 sts.
12
Round 12: Work 2 DC into each stitch all the way around. Finish off and sew in the ends.
13
To finish the wings, fold the circle in half and use a 2.5mm hook and Gold Twilleys Fingering yarn to join the two halves together by working 2 DC into each stitch all the way around. Work this same edging along the straight edge too. Finish off and sew in the ends.
14
Attach the wings to the angels back by sewing them to the main body using a needle and some yarn.
How to make the angel's hair
1
Using the Bergere de France yarn, cut some lengths of yarn that are long enough to go from one side of the head across to the other.
2
Lay them out on a flat surface to position them correctly, and then using a needle and some yarn sew them in to place on to the angels head.
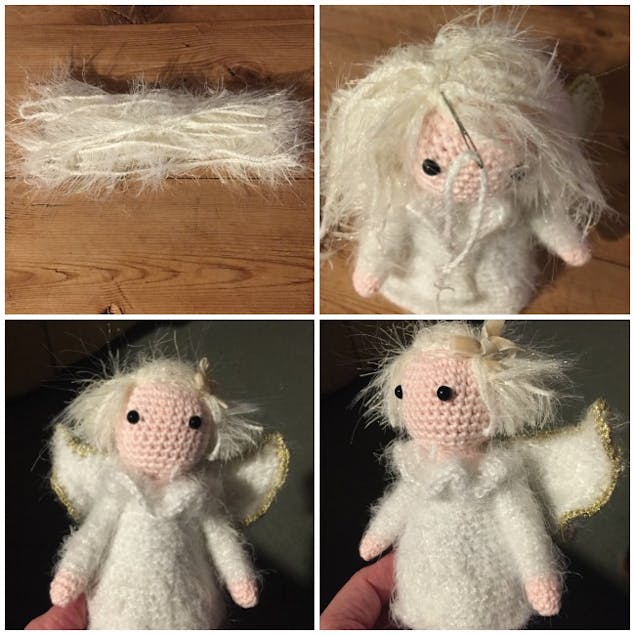
How to finish your angel
1
Round 1: Make a Magic Ring and work 8 DC into the ring.
2
Round 2: Work 2 DC into each stitch from the first round, 16 sts.
3
Round 3: *Work 1 DC into the next stitch and then 2 DC into the next stitch.* Repeat from * to * all the way round, 24 sts.
4
Round 4: *Work 1 DC into each of the next 2 stitches and then 2 DC into the next stitch.* Repeat from * to * all the way round, 32 sts.
5
Round 5: *Work 1 DC into each of the next 3 stitches and then 2 DC into the next stitch.* Repeat from * to * all the way round, 40 sts.
6
Round 6: *Work 1 DC into each of the next 4 stitches and then 2 DC into the next stitch.* Repeat from * to * all the way round, 48 sts.
7
Round 7: Work a round of DC, 48 sts.
8
Round 8: *Work 1 DC into each of the next 5 stitches and then 2 DC into the next stitch.* Repeat from * to * all the way round, 56 sts.
9
Round 9: Work a round of DC, 56 sts.
10
Round 10: *Work 1 DC into each of the next 6 stitches and then 2 DC into the next stitch.* Repeat from * to * all the way round, 64 sts. Finish off and sew in the ends.
11
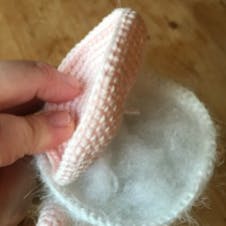
Once the base is complete, use some soft toy stuffing to stuff the angels body.
12
Take the base and with the right side facing outwards, place the base over the bottom of the body, rejoin your white yarn and join the base and the bottom edge of the dress together by working a round of DC.
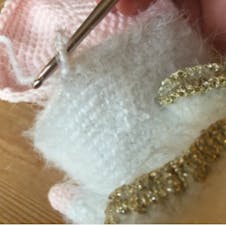
13
Work a scalloped border on to the bottom of the dress by working the following pattern all the way around the bottom edge.
14
Working in to the front loop only, work a *Sl St into the first stitch, a DC into the next stitch, and then work a HTR, TR, HTR and DC all into the following stitch.* Repeat from * to * all the way around, finish off and sew in the ends.
Now you've got the angel on top of the tree, get to work on the rest of the decorations!