How to crochet a classically chic beret!
Published on June 10, 2021 2 min readDid you hear? Beret's are back! This totally chic accessory has a long and interesting history, and now the beret is a classic extra bit of glamour to add to any outfit. This trendy accessory is the perfect finishing touch for a comfy, casual look or a fashionable addition to something a little more stylish. Either way, the beret is here to stay and this tutorial will show you how to make one for yourself!
The classic Beret Hat is unisex, and can be worn by both children, men and women! This pattern is measurement based, which allows you to adjust it to your sizing. All you need to know is the circumference of your head, if you are not sure about this, don’t worry we have attached the standard measurements guide recommended by Yarn Craft Council!
The Beret has is made with basic crochet stitches suitable for beginners to advanced level. The simplicity of the hat makes it multipurpose and can be worn during summer, to special occasions and with winter outfits.


A few things to note before you get started!
- Gauge: 5 dc stitches by 2 dc stitches = 1inch by 1 inch
- Stitches used are US terminologies
- A special stitch that is used in the tutorial is 2dcdec = two double crochet decrease. Here, you Yo insert hook in nxt dc, Yo pull through, Yo pull through 2 loops, Yo insert hook in nxt dc, Yo pull through, Yo pull through 2 loops, Yo pull through 3 loops together to form 2dcdec
- Ch 2 doesn’t count as a stitch throughout the pattern
- Slip stitch into the first dc not in the ch 2
- Entire pattern is worked in one direction in joined rounds
- Each additional round has an increase of 12 stitches
- 2dc increase should always be in the last 2dc made together
Standard head measurement guide
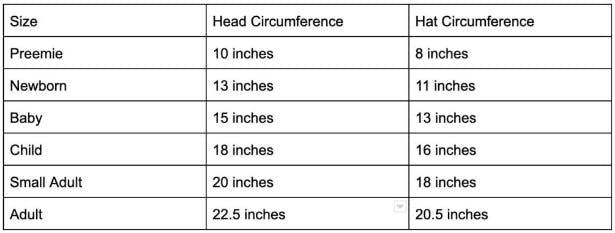
You can adjust these measurements to your liking, an adult size can range between 22 to 25 inches head circumference, if you are within that range, you are good to go.
Materials
- Paintbox Yarns Cotton DK
- 3.5mm crochet hook
- KnitPro Waves Crochet Hook
- Scissors
- Tape measure
- Set of 3 Clover Darning Needles with Case
- Clover Locking Stitch Markers
How to make your crochet beret
1
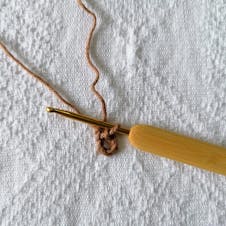
Ring: Make a slip note, ch 6, st to first ch to join to form a ring.
2
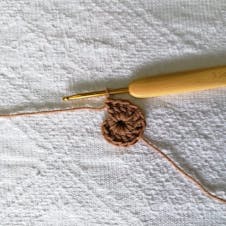
Rnd 1 : ch2 (doesn’t count as a stitch throughout the pattern), 12dc in the ring, st to join in first dc (12dc).
3
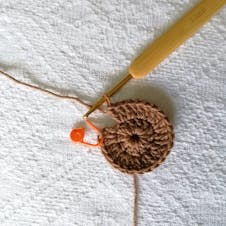
Rnd 2: ch2, ( 2dc in each dc) 12 times, st to join in first dc (24).
4
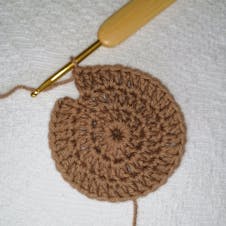
Rnd 3: ch2, (1dc in nxt dc, 2dc in nxt dc) 12 times, st to join in first dc (36).
5
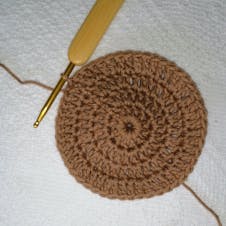
Rnd 4: ch2, (1dc in nxt 2 dc, 2dc in nxt dc) 12 times, st to join in first dc (48).
6
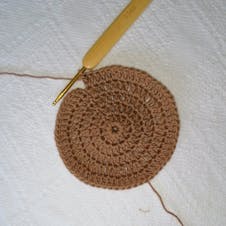
Rnd 5: ch2, (1dc in nxt 3 dc, 2dc in nxt dc) 12 times, st to join in first dc(60).
7
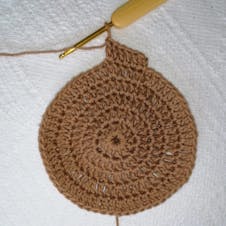
Rnd 6: ch 2, (1 dc in nxt 4 dc, 2dc in nxt dc) 12 times, st to join in first dc (72).
8
Rnd 7: ch 2, (1dc in nxt 5 dc, 2dc in nxt dc) 12 times, st to join in first dc (84).
9
Rnd 8: ch 2, (1dc in nxt 6 dc, 2dc in nxt dc) 12 times, st to join in first dc (96).
Pro Tip
After round 8 you can skip to the reduction part if you are making a child size( 18 – 20 inches circumference). Proceed to Rnd 9,10, 11 if you are making an adult size.
10
Rnd 9: ch 2, (1dc in nxt 7 dc, 2dc in nxt dc) 12 times, st to join in first dc (108).
11
Rnd 10: ch 2, (1dc in nxt 8 dc, 2dc in nxt dc) 12 times, st to join in first dc (120).
12
Rnd 11: ch 2, (1dc in nxt 9 dc, 2dc in nxt dc) 12 times, st to join in first dc (132).
Pro Tip
By the end of Rnd 11 you should have circumference of the hat, take a tape measure and slightly stretch or no stretch the circumference as you measure it. For adult size circumference should be 20 to 24 inches.
Reductions
1
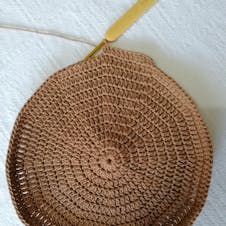
Rnd 12: ch 2, (1dc in nxt 9 dc, 2dcDec) 12 times, st to join in first dc (120).
Pro Tip
The 2dcDec is only done at the 2dc increase joint.
2
Rnd 13: ch 2,1dc in all dc stitches (120).
3
Rnd 14: Rpt Rnd 13 (120).
Ribbing
1
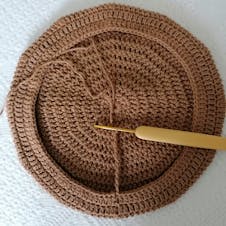
Row 1: ch 11, st in second ch from the hook and in the next 9 stitches,
st to join in dc on the brim (10).
2
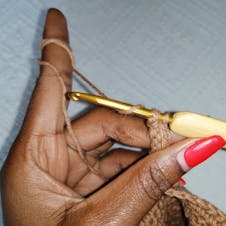
Row 2: st in nxt dc, turn in clockwise motion, st in nxt 9 stitches through blo, st through both loops in 10th stitch (10).
3
Row 3: ch 1, turn, st through both loops in first stitch, st in nxt 9 stitches through blo, st to join in nxt dc on the brim (10).
4
Row 4: st in nxt dc, turn, st in nxt 9 stitches through blo, st through both loops in the last 10th stitch (10).
Pro Tip
For the rest of the rows, alternate 3 and 4 until you complete the ribbing on the brim. There’s no skipping of stitches, so you will end up with 120 rows same as the number of stitches.
5
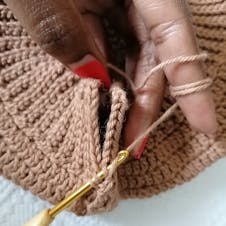
Row 120: once you are done with the last 120th row, join the two opening together using st through upper loops, ch 1, fasten off, cut the yarn, weave in.
The tip
1
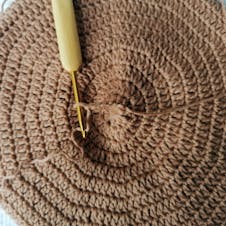
Row 1: Attach yarn on Rnd 1 in one dc, ch 5, st in 2nd ch from the hook
and in nxt 3 stitches, sk nxt dc, st in nxt dc.
2
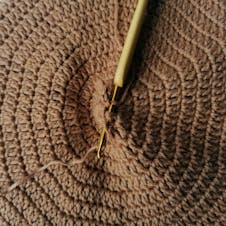
Row 2: st in nxt dc, st in nxt 4 stitches, ch 1, turn.
3
Row 3: st in nxt 4 stitches blo, sk nxt dc, st in nxt dc to attach.
4
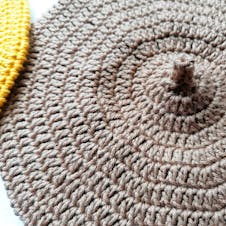
Alternate row 2 and 3 until you complete the Rnd 1 circumference, then ch 1, cut off yarn and fasten off.
And there you have it! One super easy, classically chic crochet beret, the perfect accessory for any outfit!
