
Learn how to make a bargello wall hanging
Published on June 1, 2021
Learn how to make this beautiful bargello wall hanging in a single afternoon with designer Nerrisa Pratt, creator of The Bargello Edit. Perfect for complete beginners, this modern DIY decor uses traditional tapestry techniques that will brighten up any space in your home! Just pick your fave shades of Paintbox Simply Chunky, scoop up some supplies and let's get making!

If you'd like a refresh on how to stitch the basic bargello stitch - check out our bargello guide, which will take you through the basics step-by-step!
How to make a bargello wall hanging
Prep your canvas by removing any stickers and the plastic hanger. Nerrisa is making a square wall hanging so has cut her canvas 26 cm x 26 cm.

You can cut your canvas into any size or shape you like! As a geometric pattern we recommend starting with squares or rectangles for your first wall hanging.
Stitching. Take an elbow's length of thread in the color of your choice and thread through your darning needle. This pattern will be in a count of 6.
Begin by threading through your very first square. Count up 5 stitches on your grid, threading through the 6th square to make a vertical line.

Bargello is always stitched from left to right, from the bottom to the top.
Returning back to the bottom, jump up the grid by one square, for the next stitch. Again using a count of 6 create a vertical line on your canvas.
Repeat this 4 times until you reach a peak, holding on to the tail to keep your thread in place.

Now, to create a slope with your stitches, start at the top and then count down using a count of six to make a neat geometric pattern.

Repeat steps 2-4 until the end of your grid.
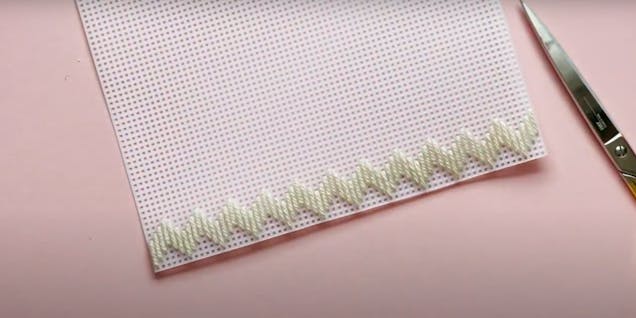
When you come to the end of your thread simply sew in your end behind the stitches. Take a new elbow's length of thread, begin by sewing in the tail, and continue as before.
Introducing a new row of color. Thread your needle with your next color. Turn your canvas over towards where you would like to start your next row of stitches. Thread through your previous stitches to secure the tail.

Thread your needle though the same square as your previous stitch color, remembering to hold the tail in place.

We're now going to work in a count of 3 to the end of the row.

Continue, alternating between counts of 6 and 3, up the board in each color to make a beautiful geometrical design. When you've completed your grid add your frame! And that's it!


Crochet a colorful Moroccan-inspired floor cushion with our fab FREE pattern
Learn how to crochet a Moroccan inspired floor cushion with our easy step-by-step guide...
Continue reading Crochet a colorful Moroccan-inspired floor cushion with our fab FREE pattern
Find the best yarn for the snuggliest blankets
Discover our ultimate guide of best yarns for blankets! Whether it’s knit or crochet, l...
Continue reading Find the best yarn for the snuggliest blankets


